Pages

Thursday, December 5, 2013

Thrifty Thursday - SIMPLIFY

I am trying to find ways to simplify my life and re-work our budget.  And it's the Holiday Season, which means more in nearly every aspect of life, right?  More money spent, more activities, more food etc.  So, I am coming up with ideas to have a special Holiday Season without breaking our budget, being overloaded with activities, and not going to the store every day to get more ingredients (I love to bake!).  Here are just a few things that I have incorporated into our lives and I want to share them with you in hopes that these tips are helpful.

*Play games with family (Skip-bo happens to be our 'game of the season')
*I asked my kids to make some paper snowflakes to hang on our windows instead of me buying more decorations (and don't kids love to see their artwork displayed for all to see...and their artwork brings a smile to my face more than store bought decorations)
*Turn on Pandora for Christmas music. (I love music.  Turning on pandora.com and choosing my favorite 'station' is a perfect way to add cheer in the home as well as getting quality 'concerts' without having to go anywhere!)
*Bake treats with what is in your pantry.  Yesterday I found an awesome recipe for Toffee Crackers and asked Jake to help me make them.  Super easy and super delicious.  Plus, he had a great time helping Mom.  recipe at end of post
*De-clutter (ok, maybe not a 'holiday activity' but it sure brings cheer to my when I know my house is a little less cluttered and a little less dirty)
*Light a candle.  This just brings all sorts of fuzzy feelings about Christmas.  Find your perfect Christmas scent and light it up!  I found two great candles at Menards on Black Friday for $1.99 each.  That certainly didn't break our budget.  I also have my wax warmer scents that I had purchased last year.  So, for under $5 I have a lovely scented home.

What are some ways your are enjoying your Holiday Season this year?

Toffee Crackers
50 saltine crackers
2 sticks butter
1 cup brown sugar
Line jelly roll pan with foil and spray non-stick spray on foil. 
Place crackers in rows on pan
Melt butter and sugar and bring to a boil.  Boil for 3 minutes.
Pour over crackers and spread evenly
Bake at 325 for exactly 8 minutes, do not overbake
Let cool.
YUM!

*I had all these ingredients on hand


Thursday, November 21, 2013

Thrifty Thursday - Freezing Cabbage

 I had a half a head of cabbage in my fridge that needed to be used up, but we don't eat a lot of cabbage.  I decided to freeze it and bag it in snack sized bags so that I can pull a small amount out to add to a soup when needed.  I think it's the perfect way to not waste the cabbage, thus not wasting money, and a great healthy addition to soup!  

I filled a pot with water and allowed it to come to a boil. I then added the shredded up cabbage and let it blanch for 2 minutes (cook at a boil).  After the two minutes were up I took the pan off the burner, drained the cabbage and cooled it all off with a cold water bath.  Let it set a few minutes longer to make sure it was cooled down.  Then I put it in snack sized bags labeled cabbage and today's date.  Stick in the freezer and when I make my family a pot of soup, I can add some cabbage to it!

Monday, November 18, 2013

How is My 'Stick to My List' Going?

I must say that I am loving sticking to my shopping list.  I truly do write down the essential(s) that I need at the store and only purchase those.  AND...another thing added along with this is that I am watching our gas budget as well. So, how am I doing with that?  I don't go anywhere!  I know when I have to go somewhere, what day I need to go, and then I plan my errands around that time.  No more quick trips here and there.  Our gas budget is really doing well!  I also utilize the discount from our local grocery store.  Each time I purchase groceries I receive a coupon for 5 cents - 6 cents off of gas.  It expires the next day, so I use it before it expires.  It may not save a lot of money at one fill time, but over time it will save money!  

What are you doing to save money? 

Thursday, November 14, 2013

Thrifty Thursday - Bountiful Baskets

I was reading up on a blog about ways to save money and she mentioned Bountiful Baskets.  I googled it and found out that our state does have Bountiful Baskets delivered right to our town!  Every two weeks you place your order online and pay for it when your order is placed.  Then, that Saturday (or your specific delivery day) you bring your basket and go pick up your order.  I placed my first order last week and picked it up last Saturday.  I just purchased the minimum order of 1 produce basket.  50% fruit and 50% veggies.  Each order is a surprise as to what is in the basket, which I find fun!  You can also upgrade to organic, add breads and other items. It all depends on how you want to order.  I purchased my basket for $15.  There was a start up fee of $3 for Bountiful Baskets to purchase a basket to hold my produce in while they are organizing it and awaiting my arrival.  That is a one time fee.  And there is a $5 processing fee.  So, for under $25 (for my first order) and about $20 for all next orders of the same type I get an awesome deal!  Saves me money and time.  I don't have to drive far to get great produce and it takes about 5 minutes to get in and pick up my basket of goodies.  Here is the link to Bountiful Basketshttp://bountifulbaskets.org/

Want to know what I received in my first basket:
1 Coconut
1 Romaine Lettuce Head
1 Cabbage Head
3 Purple Onions
1 Bundle Spinach
5 Cutie Oranges
4 Fuji Apples
8 Bananas
1 Bunch Asparagus
8 Roma Tomatoes
8oz. Fresh Mushrooms
3 Zucchinis
1 Mini Watermelon

Now that's an awesome basket!  Everything tastes great!

Saturday, November 9, 2013

Diaper Bag Complete!

 A little while ago I posted the fabric and pattern for the diaper bag I want for this baby.  I didn't want to have a bag that everyone could have, so I opted to challenge myself and make my own.  To say that patterns intimidate me is an understatement.  But...I made this bag in segments.  First I ironed the fabric.  Then I cut out the pattern pieces.  Next I cut out the fabric.  Then I set it aside and read the pattern over a number of times to understand what I was doing.  The pattern calls for interfacing.  I chose to use batting instead because I like the thicker feel in a diaper bag.  I really am glad I went that route.  
The above picture is of the front with the flap down (fastened with velcro).
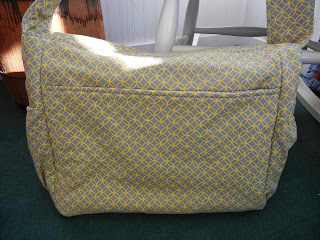
 Here is the back with a back pocket.
 And the inside with two views.  A nice big pocket on the one side.  Don't you love the lining??

And a side view.  There is a pocket on each side of the bag.  I love everything about this diaper bag.  I love the colors because it will work perfect for a girl or a boy.  I love the lining fabric (I love that fabric, but thought it was too busy for the outside, thus a more calm outer fabric was chosen.)  I finished the bag yesterday and am really excited to use it!

Thursday, November 7, 2013

Thrifty Thursday - Budgeting for Christmas Gifts

It's November and the time of year to start getting ready for the Holiday's and Christmas Shopping.  I want to share some tips and guidelines that our family has been practicing.  This is not an extensive list, but some of the major keys to keeping Christmas affordable and enjoyable.  Because, truly, who wants to begin the New Year wondering why on earth we spent so much at Christmas and asking ourselves
 'How are we going to pay it off?'  
Not me, that's for sure.  

#1.  SAVE FOR CHRISTMAS:  We have an envelope marked 'Christmas Gifts' that we put money into each month during the entire year.  That way when it comes around to Christmas we already have the money and aren't surprised that Christmas is on December 25th.  *If you are just learning about this tip of saving during the year then you will want to start your envelope in January of 2014 for the following Christmas.  But, you can still decide on a reasonable amount to set aside for this Christmas. 

#2.  BUDGET - This is when my husband (Jason) and I sit down and decide how much money we are going to spend on each person for Christmas.  Only with the money saved during the year in the 'Christmas Gifts Envelope'.  No new funds will be added.  We make out the list of people we need to purchase for: Our kids, each other, Grandparents, Nieces and Nephews, Teachers, other special people.  Some people may have a huge amount budgeted/saved for Christmas, while others have a smaller amount.  The amount doesn't matter, it's the gift of giving and thinking of them that does. 

#3.  INTERVIEW YOUR KIDS:  See what they would like for Christmas and from Santa.  Ask for lots of ideas because some of the items they may list are pretty expensive.  Let them know that you also want inexpensive gift ideas.  Make sure you write down their ideas because, if you are like me, you'll forget by the time you get to the store.  Some of the items they'll ask for you can just skip with writing down because you know they won't play with it or use it anyway. 

#4.  BAKED TREATS:  This is an excellent way to give a gift without spending a lot of money.  These baked treats can be for Teachers, Grandparents, and other special people in your life.  You'll probably be baking a lot anyway so you may as well give some of it away. 

#5.  DOLLAR STORES:  This is a great place to let your kids shop for each other.  You give them a dollar and tell them to go find a gift for their sibling.  They have fun choosing the gift (makes it more personal for them than having parents pick out the gift for them to give), paying for it, and wrapping it. 

These are 5 tips for you to think over and implement.  
Stay tuned for more Holiday Budgeting Guidelines!!!

Saturday, November 2, 2013

I stuck to my Challenge!!

For the month of November I have challenged myself to sticking to my shopping list and not putting anything in the cart/basket if it's not on the list, even if I think I could use it.  So, today was the big day!  It was my 'one month of shopping' day.  (I try to do my major shopping only once a month).  The girls and I headed to town to get the shopping done.  There were a few times where I stuck something in my cart and then had the girls put it away since it was not on my list!  It worked!  I am super excited to tell Jason about my shopping trip and how well I did with our budget.  I even told my girls before we started shopping that they may as well not even ask for anything because if it's not on the list, it isn't getting in the cart.  They did ask for things, but I said, 'So sorry.  Not on the list'.  To which they thought was kind of funny.  I am really proud of myself.  And proud of my girls for all the help they were.  Lifting heavy items for me and unloading the van when we got home.  

So far, the challenge is a huge success and motivator!

Thursday, October 31, 2013

Thrifty Thursday - 1 Month Challenge

For the month of November I am challenging myself to stay within my shopping list.  Not to put anything in my cart or basket that is not on my list.  Kind of a silly month to start it as Black Friday is this month.  BUT... I want to see how much I save and what I can live without.  I will keep you posted as to how it is working, what I like about it, what I don't like, and anything else I learn along the way.

Are you challenging yourself to have your money work for you? If so, how?

Wednesday, October 30, 2013

Tuesday Tutorial on Wednesday - Teacher Gift

 I had a lot of fun making this Teacher Gift.  It's perfect for Christmas, end of year, or welcome back.  Pretty simple to make, too!  Clean out an empty soup can.  Then get out your paint (I used black acrylic paint that I had on hand).  Line the tip of the crayon up to just over the top edge and see how much at the bottom you need to paint (some cans you won't need to paint because the crayon will cover the entire can)  Paint the bottom edge of the soup can with two coats of paint, allowing for drying in between coats.
 Next get out your crayons your Tacky Glue.  You will want the 'Crayon' word to show, so put a strip of glue on the back side.  Stick to the can.  I glued about 6 crayons on at a time and allowed them to dry before rotating the can to add more crayons.
When you have the crayons all glued on and the glue is dried, tie a ribbon around the front and toss new pencils into the can.  Super Cute, if you ask me!  And what teacher isn't happy to have a few extra pencils on hand!?!

Supplies:
Soup Can (cleaned out and label removed)
Paint (if needed)
New Pencils
Ribbon
Large box of Crayons (I used a 10 3/4oz soup can and it took 28 crayons to cover it)

Thursday, October 24, 2013

My Quilts!

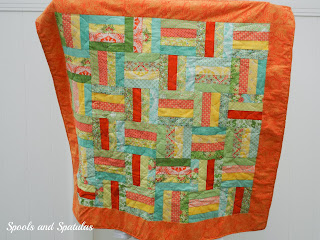
 I didn't realize it until asked, but I don't have any of my quilts posted on this blog.  Now I do!  These are the first three quilts I have made (with the exception of the square quilt I made in high school and the Flying Geese quilt I started when I was pregnant with Tayler 9 years ago...but that one's not finished.  Anyone else have a UFO from that far back??) in the past 2 years.  I do enjoy quilting and learning new techniques.  All three of these are made from jelly rolls.  Love those! The top quilt is on our couch in the living room and the other two were given as gifts. 

I have two more quilts in the process of being made and neither of them used the Jelly Rolls.  I am excited to see how they turn out!  

Do you quilt?  If so, how long have you been quilting?

Thrifty Thursday - Make Your Own Bread Crumbs

A while back I had run out of bread crumbs but didn't want to go and buy some.  I started saving the heals of our bread and dried them out.  When they were completely dried I broke them into small enough pieces to fit in my blender.  I blended them up until they were the right 'bread crumb' consistency.  Add a little seasoning if you wish, or just add the seasoning when you use the bread crumbs in a recipe.  Saves you a trip to the store and keeps a few dollars in your pocket.  And really, who eats the heals anyway?

Tuesday, October 22, 2013

Tuesday Tutorial - Pumpkin Muffins with Drizzled Icing

Nothing feels more like Fall than baking with pumpkin.  These muffins are deliciousness!  Your whole family will love them just like mine!!

Pumpkin Muffin Recipe:

2c. flour
2/3c. brown sugar
1/3c. sugar
1Tbsp. baking powder
1tsp. salt
1tsp. cinnamon
1/4tsp. ground ginger
1/2c. butter, softened
1/2c. pumpkin
2 large eggs
1/3c. buttermilk *

Drizzled Icing:
Powdered sugar
Milk
Vanilla extract
- I don't use an exact measurement for my icing.  I dump, in a bowl, some of the powdered sugar, add a little milk and a touch of vanilla (to take away the strong powdered sugar taste).  When I mix it with a whisk, if the consistency is runny with a touch of thickness to it, then it's done.  I do taste test it to see if I need to add more vanilla.  Play around with the icing.  You can't go wrong.  

Mix all ingredients together in mixer.  Line muffin tins with muffin liners.  Fill 2/3 full.  Bake at 400 for 12-15 min, or until knife inserted in center comes out clean.  Cool completely.  Mix icing together and drizzle over the top of the cooled muffins.  Brew your favorite hot drink, grab a muffin, and enjoy the Fall treat.

*I don't keep buttermilk on hand, so to make your own add a little white vinegar to your milk, making it 1/3c.  Works like a charm and saves a trip to the store and saves you from purchasing buttermilk.  Double bonus!


Wednesday, October 16, 2013

New Project - Diaper Bag

I haven't announced this on my blog yet:  we are expecting baby #4 on January 8th!  We are excited and I am excited to have less than 3 months left! Wahoo!  Our youngest is nearly 7 years old, so we do not have any baby items in the house.  I decided that I wanted to make a diaper bag because #1) I like sewing and #2)  I like having an 'original' instead of a bag everyone else will have.  We like the surprise of waiting until birth to find out if we have a boy or girl, so I think this color of fabric is perfect for either a girl or boy.  I didn't want a 'baby' looking bag, something stylish is what I want.  Something I and Jason can carry around and like.  I am eager to begin, but nervous to begin.  Following patterns is not my strong point (ask my Mom!).  I can make quilts, but sewing from a pattern kicks my tush.  First step: pre-wash fabric.  I'm pretty sure I can complete that task correctly!  I will show you the results as soon as it's complete! 

Tuesday, October 15, 2013

Tuesday Tutorial - Butterscotch Blondies

It rained all day yesterday and today it is still cold, minus the rain.  I felt like baking a treat.  I happen to love blondie brownies and so I want to share this recipe with you:  

Butterscotch Blondies:
2 3/4c. flour
2 1/2tsp. baking powder
1/2tsp. salt
2/3c. shortening
1 lb. brown sugar
3 eggs
1 package butterscotch chips

In a large saucepan, melt the shortening and then add the brown sugar.  Stir and cool (about 10 minutes to cool).  Beat eggs in, one at a time.  Add the flour, baking powder, and salt.  Beat.  Add butterscotch chips.  Grease a 9x13'' pan and pour batter in.  Bake at 350 for 20 minutes, or until sides are golden and top is slightly golden.  

Hope you enjoy!!

Thursday, October 3, 2013

Thrifty Thursday - Stock Up on Milk

Does anyone else get tired of running to the store to pick up perishable things?  I sure do.  So I decided to start purchasing gallons of milk while it's on sale and then freezing it!  It works great!  I watch the sale add and when I see that it's on sale I go to the store and pick up 5 gallons or so and freeze it.  First you have to take off the lid and pour just a little bit out (don't just pour it down the drain, drink it!) so that when it freezes, the jug won't burst from expansion.  Put the lid back on and put it in the freezer.  When you need milk, take a gallon out of the freezer and set it on a plate on your counter and let it thaw for exactly 8 hours.  There will still be an ice chunk in it, but it continues to thaw in the fridge.  Every time I take the jug out, I shake it to help brake up that ice chunk.  This is a great way to save money on milk and gas money from decreasing your trips to the store!  It's a win win. 

Thursday, September 26, 2013

Sweet Popcorn Mix

My kids have a 4 day school week here in Parker, so on Thursday nights I try to let them kick back and relax and not worry about homework since they don't have school on Fridays.  I made up some popcorn and tossed in some candy corn, perfect for Fall, and will turn on Gilligan's Island...a favorite show of theirs.  Pretty simple snack, and inexpensive as well!  Double bonus! 

What fun quick snacks do you make?

Thrifty Thursday - Homemade Bread

I don't know about you, but I get tired of going to the store and buying bread.  It's the cost of it, and sometimes the taste, that gets to me.  I pack my kids lunches each day for school (there's another Thrifty tip: pack your kids lunches!) each day and so it requires quite a bit of bread.  I have tried making bread from scratch without much success.  Until now!  I love this recipe that I found in one of my cookbooks: Powder River Pantry.  It's a speedy dough recipe that is used for dinner rolls or donuts, but I wanted to give it a try and make bread with it.  Perfection!  And it's not the typical 5 million hour process.  It makes up two loaves that will last a little longer than one loaf from the store.  And...the kids love it...and the crust!  If you can get a kid to love bread crust, you know you're on to something grand.  They always say, 'Mom, we love your homemade bread!'  That pleases this Momma for sure.  I've listed the recipe and broke down the estimated cost for you.  Seriously, you can't go wrong.  Enjoy your simple bread making time and cut off a warm slice for yourself and smear it with butter.  You'll never look back.

Speedy Dough:
2c. warm water
1/3c. sugar
2pkg or 4 1/2tsp yeast
1Tbsp salt
2c. flour
2 eggs
1/3c. shortening
5c. flour

Combine warm water, sugar, and yeast.  Let set until yeast is dissolved.  Add salt and 2c. flour.  Beat with mixer.  Add eggs and shortening and beat 1 minute.  Add in 5c. flour (more if still sticky) and beat gently at first and higher later as flour gets incorporated.  When dough is mixed and not sticky, let stand for 20 minutes, covered.  Split dough into two greased loaf pans, cover and let stand for 20 minutes.  Bake at 350 for 25 minutes, or until top is a nice golden brown.  Take out of oven and spread butter on top for a nice glistening look.  Cool.

*I use my Kitchenaide Mixer with the dough hook and it works wonderfully!

Brakedown Of Cost:
Flour: 50 cents
Eggs:  20 cents
Sugar:  25 cents
Water: 0
Shortening: 25 cents
Salt: 5 cents
 
Total for two loaves of homemade bread:  $1.25!!
*estimated costs

I am sure when you go to purchase your next loaf of bread, you'll choke at the price and remember that you can make homemade bread for over half the cost.  Plus, there are no preservatives in this bread!

Tuesday, September 24, 2013

Tuesday Tutorial - Baby Minkie Ribbon Blankie

 I have been wanting to use minkie fabric for some time now and found the cutest idea!  This is a Baby Minkie Ribbon Blankie.  The fabric is so soft that I have heard babies love it and it becomes their favorite blanket.  

To Start:
cut two squares of minkie, 14"x14"
cut 3 different ribbons, 8 strips from each ribbon at 4" long
*I chose to use 3 different ribbons, you can choose as many as you'd like, just make sure that there will be 6 ribbon strips for each side.
above you see the 14" square minkie and the ribbon strips
 These are the ribbons I chose.  Super cute, don't you agree!!?!!
 And another look at the 14" square minkie (remember to cut two of these!)
 Fold the ribbon strips in half and pin to the right side of one of the minkie squares.  Pin a little higher than shown here so that when you start sewing and turning the blankie around, the pins won't be sewn into it.  Just a little tip I learned while making mine.  6 ribbons per side.
 When you have all the ribbons pinned to the sides, lay the other 14" minkie square on top, wrong side showing, as pictured above, and pin the sides together.
 Leave a good sized gap not pinned so that when you are done sewing your blankie together, you can turn it right side out.  Maybe 6 inches or so.
 Blurry picture, but this shows the straight stitch around (1/4" stitch) and then I went back around to zig zag to reduce raveling once it starts to get washed.  Also, snip the corners, being sure not to snip the straight stitch.  This helps make pointed corners instead of bunched up corners.  Once this is done, turn it right side out and sew a straight stitch along the very edge of the blanket to secure the gap you left for turning around and to secure the blanket  more.  Do this straight stitch all the way around.
 This is it!  Isn't it cute!  These are perfect for gifts for sure. 

Happy Sewing!

Monday, September 23, 2013

September Winner!!

The Winner of these two adorable fat quarters for September is Loann!  Congratulations and I will get these shipped to you soon!!

Thursday, September 12, 2013

Thrifty Thursday

I've been thinking over starting a weekly post on Thursdays called 'Thrifty Thursday'.  I want it to be about things I've found at great prices or other ways to save money.  So, today is my first day to post 'Thrifty Thursday'!

Yesterday I went to a nearby town to visit a friend and she brought me to their local thrift store.  I love thrift stores because you never know what you will find!  In the back was a section of fabrics and I was able to score these two pieces at great prices.  As you can see from the tag on the flower print fabric, it came to $9 but I only paid $2!  It is well over a yard of fabric.  Probably a few yards of it here.  And then the fun piece in front cost me a mere 50 cents.  There's not a lot of it, but enough for at least a cute pillow front.  I was a happy shopper and will definitely go back to see what else I can find.

Wednesday, September 11, 2013

Chickens!

We purchased baby chicks shortly after we moved here.  Like a week. Ha!  Seriously.  Never had chickens before, but I've always wanted some.  Are they for eggs or for eating?  Eggs.  Thus, we have 'layers', to be more accurate.  Not broilers (for eating).  I'm getting the lingo down, can't you tell???  Anyway... our chickens are growing up and have gotten big enough that they are now 'free range' chickens, which means they are not fenced in at all times.  We let them roam our yard and they help us by eating the weeds and the bugs.  Just don't watch them eat the bugs, it'll turn your stomach.  So, the brave girls have now found a favorite roosting spot, which happens to be my nice outdoor furniture.  Ugh.  They sure look pretty on it, don't that?  I think they do, until I got closer and saw that they poo all over it.  Grrr...  I'll get over that, but the second they wander into my front yard and eat my flowers they might become broilers instead of layers. Lol.  They are actually quite fascinating to watch.  They aren't scared of much, but when they do get spooked you will see them all running for the coop.  Which is just hilarious to me!  I love looking out my window and all of a sudden the nice calm chickens that were in search of food all high tail it to the coop.  Too funny!  I am eager for them to get a bit older to start leaving eggs for us to go gather, but in the mean time I enjoy fresh eggs purchased from our neighbors (our neighbors live a mile away!  That's how it works out in the country...your neighbors live further than two steps away.)

How about you?  Any chicken stories, or other animal stories on the ranch, farm, or in town you'd like to share? 

Tuesday, September 10, 2013

Tuesday Tutorial - Fall Wreath Under $3!

 This is such an easy wreath to make and it costs next to nothing, which is always a plus for me!  First, I went out to my yard and picked up fallen sticks/twigs and also cut some off of a partially dead bush out front.  We moved here in July and there are some trees that need some trimming, but in the meantime...I can utilize the sticks for projects! Works for me.  The amount of sticks/twigs doesn't matter.  You choose how thick you want the wreath to be and how long you want the sides to be.  I made mine in a rectangle.
 This was the most expensive part of this project.  I spent a whole $1.59 on this twine at our local grocery store.  Mind you: I was way impressed that our store had this! 
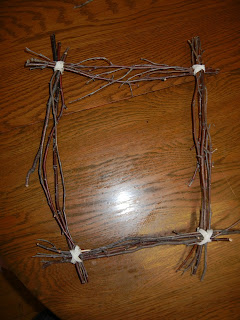
 Next I laid out the twigs into the shape I was looking for and matched up lengths of the twigs.
 And now the twine... Start by wrapping it and tying a knot around a corner of the wreath.  It's kind of frustrating, but you'll get it done quickly.  After the knot is tied, start wrapping it in and 'X' formation around the corner.  Do this to all four sides.  Tie it in a knot to secure it.
 Like so...
 And so...  Now you can see the wreath and all it's straggly branches.  Time to get out your heavy scissors or wire cutter and trim it up to how you want it to look. 
 Like such...  
Since it is a 'Fall Wreath' I went and found my stash of wooden letters and spelled out 'Fall' (that's the other cost in this wreath, I'd say maybe 50 cents worth...maybe).  Painted the letters green and let them dry.  In the meantime I went to my fabric stash and found some orange fabric strips from a jelly roll I used in a quilt.  Perfect for Fall.  I sewed a straight line down the center and then pulled the end strings to 'gather' the fabric. 
 I then tied that orange fabric onto the wreath and glued (with tacky glue) the 'FALL' onto it.  I tied another smaller orange fabric strip at the top to hang it up with.  And there you have it, folks!  A cute, inexpensive, Fall Wreath for your door.  Oh, and speaking of doors...
Behind my cute wreath is my ugly door.  Lovely, isn't it?!? Ugh.  That's another project to get done in this house (among many, mind you!)  So, stay tuned to see what color I paint this door!  I am super excited about it!  And excited about my wreath!  Go have fun making your own!  

Happy Fall, Everyone!

Thursday, September 5, 2013

Yard Sale SCORE!

A friend called me up yesterday and let me know that a few miles away was a huge yard sale.  You fill a grocery sack with what you can stuff in it and pay $3/bag.  Deal or What!?!?  So, after running a few errands this morning I headed East of town and found the yard sale.  Tons of items there.  I spent a good hour or so looking through and filling bags.  I filled 5 bags and had two items for 50 cents each on the side.  Total:  $16.  Can't beat that, can you!  Most of the 5 bags were filled with clothes for the kids.  Man, am I excited when I can get name brand clothes for next to nothing!  Now I get the fun of washing :)  

What kinds of deals have you found lately?

Tuesday, September 3, 2013

Tuesday Tutorial - Jean Purse

 Aren't these the cutest jeans??  We were at my brother and sister-in-law's this past Spring and my niece gave these jeans to Tayler.  Super cute!  But, the girls got a hold of a scissors and cut holes in them to be 'in style'.  So, I decided to make a cute jean purse with them.
 I love the detail on the pockets!
 See the nice holes??  Ugh.
 I wanted to keep all of the pocket so I cut a little below it to allow room for the seam allowance.  Do this to each leg.
 Now you have cut offs :)
 Turn them inside out and pin them together.  Be sure to not sew the pockets into the seam.
 Stitch a straight line.
 Now zig-zag below the straight line to keep the jean from raveling.
 Find a cute fabric and cut it to the width you would like for the handles.  I found this blue and red fabric in my stash from a jelly roll.  So, this handle is 2 1/2 inches wide.  The length of the handle is your choice as well.  Sew a straight line down the side of it, leaving both ends open for turning right side out.  Zig-Zag.
 Pin the handles to the inside of the jeans.
 Like so...
 I stitched a square in mine.  You can stitch an 'X' if you like, or however you want to secure it to the jean.  Do this to all four ends of the handle.
 Like such...
And you have yourself a super cute jean purse!  I live that the tags still show.  The pockets are perfect for phones, pens, lip gloss and more!  Now you know what to do with all those old jeans in your kid's closets!