Pages

Thursday, October 31, 2013

Thrifty Thursday - 1 Month Challenge

For the month of November I am challenging myself to stay within my shopping list.  Not to put anything in my cart or basket that is not on my list.  Kind of a silly month to start it as Black Friday is this month.  BUT... I want to see how much I save and what I can live without.  I will keep you posted as to how it is working, what I like about it, what I don't like, and anything else I learn along the way.

Are you challenging yourself to have your money work for you? If so, how?

Wednesday, October 30, 2013

Tuesday Tutorial on Wednesday - Teacher Gift

 I had a lot of fun making this Teacher Gift.  It's perfect for Christmas, end of year, or welcome back.  Pretty simple to make, too!  Clean out an empty soup can.  Then get out your paint (I used black acrylic paint that I had on hand).  Line the tip of the crayon up to just over the top edge and see how much at the bottom you need to paint (some cans you won't need to paint because the crayon will cover the entire can)  Paint the bottom edge of the soup can with two coats of paint, allowing for drying in between coats.
 Next get out your crayons your Tacky Glue.  You will want the 'Crayon' word to show, so put a strip of glue on the back side.  Stick to the can.  I glued about 6 crayons on at a time and allowed them to dry before rotating the can to add more crayons.
When you have the crayons all glued on and the glue is dried, tie a ribbon around the front and toss new pencils into the can.  Super Cute, if you ask me!  And what teacher isn't happy to have a few extra pencils on hand!?!

Supplies:
Soup Can (cleaned out and label removed)
Paint (if needed)
New Pencils
Ribbon
Large box of Crayons (I used a 10 3/4oz soup can and it took 28 crayons to cover it)

Thursday, October 24, 2013

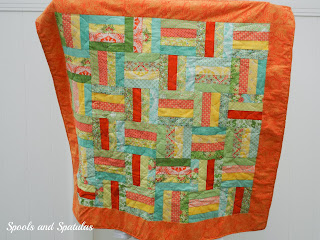
My Quilts!

 I didn't realize it until asked, but I don't have any of my quilts posted on this blog.  Now I do!  These are the first three quilts I have made (with the exception of the square quilt I made in high school and the Flying Geese quilt I started when I was pregnant with Tayler 9 years ago...but that one's not finished.  Anyone else have a UFO from that far back??) in the past 2 years.  I do enjoy quilting and learning new techniques.  All three of these are made from jelly rolls.  Love those! The top quilt is on our couch in the living room and the other two were given as gifts. 

I have two more quilts in the process of being made and neither of them used the Jelly Rolls.  I am excited to see how they turn out!  

Do you quilt?  If so, how long have you been quilting?

Thrifty Thursday - Make Your Own Bread Crumbs

A while back I had run out of bread crumbs but didn't want to go and buy some.  I started saving the heals of our bread and dried them out.  When they were completely dried I broke them into small enough pieces to fit in my blender.  I blended them up until they were the right 'bread crumb' consistency.  Add a little seasoning if you wish, or just add the seasoning when you use the bread crumbs in a recipe.  Saves you a trip to the store and keeps a few dollars in your pocket.  And really, who eats the heals anyway?

Tuesday, October 22, 2013

Tuesday Tutorial - Pumpkin Muffins with Drizzled Icing

Nothing feels more like Fall than baking with pumpkin.  These muffins are deliciousness!  Your whole family will love them just like mine!!

Pumpkin Muffin Recipe:

2c. flour
2/3c. brown sugar
1/3c. sugar
1Tbsp. baking powder
1tsp. salt
1tsp. cinnamon
1/4tsp. ground ginger
1/2c. butter, softened
1/2c. pumpkin
2 large eggs
1/3c. buttermilk *

Drizzled Icing:
Powdered sugar
Milk
Vanilla extract
- I don't use an exact measurement for my icing.  I dump, in a bowl, some of the powdered sugar, add a little milk and a touch of vanilla (to take away the strong powdered sugar taste).  When I mix it with a whisk, if the consistency is runny with a touch of thickness to it, then it's done.  I do taste test it to see if I need to add more vanilla.  Play around with the icing.  You can't go wrong.  

Mix all ingredients together in mixer.  Line muffin tins with muffin liners.  Fill 2/3 full.  Bake at 400 for 12-15 min, or until knife inserted in center comes out clean.  Cool completely.  Mix icing together and drizzle over the top of the cooled muffins.  Brew your favorite hot drink, grab a muffin, and enjoy the Fall treat.

*I don't keep buttermilk on hand, so to make your own add a little white vinegar to your milk, making it 1/3c.  Works like a charm and saves a trip to the store and saves you from purchasing buttermilk.  Double bonus!


Wednesday, October 16, 2013

New Project - Diaper Bag

I haven't announced this on my blog yet:  we are expecting baby #4 on January 8th!  We are excited and I am excited to have less than 3 months left! Wahoo!  Our youngest is nearly 7 years old, so we do not have any baby items in the house.  I decided that I wanted to make a diaper bag because #1) I like sewing and #2)  I like having an 'original' instead of a bag everyone else will have.  We like the surprise of waiting until birth to find out if we have a boy or girl, so I think this color of fabric is perfect for either a girl or boy.  I didn't want a 'baby' looking bag, something stylish is what I want.  Something I and Jason can carry around and like.  I am eager to begin, but nervous to begin.  Following patterns is not my strong point (ask my Mom!).  I can make quilts, but sewing from a pattern kicks my tush.  First step: pre-wash fabric.  I'm pretty sure I can complete that task correctly!  I will show you the results as soon as it's complete! 

Tuesday, October 15, 2013

Tuesday Tutorial - Butterscotch Blondies

It rained all day yesterday and today it is still cold, minus the rain.  I felt like baking a treat.  I happen to love blondie brownies and so I want to share this recipe with you:  

Butterscotch Blondies:
2 3/4c. flour
2 1/2tsp. baking powder
1/2tsp. salt
2/3c. shortening
1 lb. brown sugar
3 eggs
1 package butterscotch chips

In a large saucepan, melt the shortening and then add the brown sugar.  Stir and cool (about 10 minutes to cool).  Beat eggs in, one at a time.  Add the flour, baking powder, and salt.  Beat.  Add butterscotch chips.  Grease a 9x13'' pan and pour batter in.  Bake at 350 for 20 minutes, or until sides are golden and top is slightly golden.  

Hope you enjoy!!

Thursday, October 3, 2013

Thrifty Thursday - Stock Up on Milk

Does anyone else get tired of running to the store to pick up perishable things?  I sure do.  So I decided to start purchasing gallons of milk while it's on sale and then freezing it!  It works great!  I watch the sale add and when I see that it's on sale I go to the store and pick up 5 gallons or so and freeze it.  First you have to take off the lid and pour just a little bit out (don't just pour it down the drain, drink it!) so that when it freezes, the jug won't burst from expansion.  Put the lid back on and put it in the freezer.  When you need milk, take a gallon out of the freezer and set it on a plate on your counter and let it thaw for exactly 8 hours.  There will still be an ice chunk in it, but it continues to thaw in the fridge.  Every time I take the jug out, I shake it to help brake up that ice chunk.  This is a great way to save money on milk and gas money from decreasing your trips to the store!  It's a win win.